During the course Beginning C++, we learn how to make a template in CodeLite. And templates are brilliant, as we then can re-use a setup easily without choosing the same selections every time.
Sadly, I made an error in my template, and it took a while before I found out how to change it. Not because it is especially hard, but because I did not find any reference on how to do it on the internet and I forgot to look in the right place on my PC.
So, I present you with how to change a CodeLite template on Windows PCs.

Where are the files located?
All the settings for CodeLite are saved under the AppData folder, usually on the C-drive.
The path you are looking for is usually called
C:\Users\<username>\AppData\Roaming\codelite\templates\projects
If you don’t see the folder called AppData, you have to enable Hidden items under the View menu.

Change the files
Before you do any changes to the files, remember to close CodeLite. That way you won’t have any collisions, and you will be sure that your changes are saved. Also, do make sure to take a copy of the template file. If CodeLite can’t parse it correctly, it won’t show up in the New project wizard.
There are two or more files in the folder, depending on how many templates you have and the number of files each project contains. The main file is called something like TemplateName.project. This file contains all the settings for the template. It is just a text-file in XML-format so you can use any text editor to change whatever configuration you want and then just save the file again.
Settings
In the course, we are using the C++14 standard, so we set the options for the compiler to use this standard when compiling. You can find this setting again in the file:

You will also see the description of the template and many other project settings in this file, including which files should be automatically included in and added to the new project.
Included files
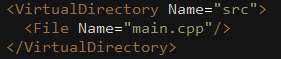
Towards the bottom of the XML-file, you will see the files the project will contain when you create it in CodeLite. In my case, it’s just one file, main.cpp, and it will be placed in the src folder.
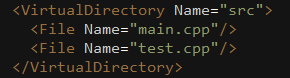
You can add more files to a project template by just creating them and saving them to the template folder and then add a new line for each file you want to add.

Leave a comment