Blog

  • Beginning C++ 93-100: Characters and Strings

    Characters and Strings… We have worked some with it so far, but just really putting the strings out there for the user to read and then reading in a single character or number.

    I guess we will learn more about what you can do with strings in this chapter. I just watched some video saying that C++ didn’t have strings, so I’m a little confused though. But I hope everything will be more apparent after watching this chapter of the course.

    blur close close up cord
    Yes, these are strings

    Lecture 93: Section Overview

    This section shows the legacy of C in C++. We will work with both C-style strings and C++-style strings and learn the difference between them

    The instructor does advise us to use C++ strings, so I guess that C++ has some aces up its sleeve when compared to the older C. The instructor hints to C++ strings being objects, so I think that’s where some of the difference lies.

    Lecture 94: Character Functions

    The header-file cctype includes several functions for working with characters. You can test characters for several properties. For instance, you can check if the character is a letter or a digit, or if it’s lowercase or uppercase.

    It also has functions for converting characters to lowercase or uppercase that are very handy.

    I’m a little bit confused about these though since I used tolower() in the last section challenge, but I did not include the cctype header. I tried googling an answer for this but was unable to find any, so I’ve asked it in the Q&A-section for the video.

    Lecture 95: C-Style Strings

    C-style strings are just an array of characters in contiguous memory that is terminated by a null character. This means that a string uses at least one memory space more than is shown on screen since the last character is used by C++ to determine where the string ends.

    This can lead to problems if you treat it like a regular array, as the termination character is a valid memory space and you won’t get any errors or warnings from the compiler if you try to change it.

    I made a small program showing what can happen if you don’t treat strings with care. I declared a char-array with 9 spaces and printed it. I then made two for loops to write out the numbers from 1 to 9, just to make it easier to see the characters, and then I printed each character by itself, looping through the array with a range-based for loop.

    Section 11_95 - fig 1

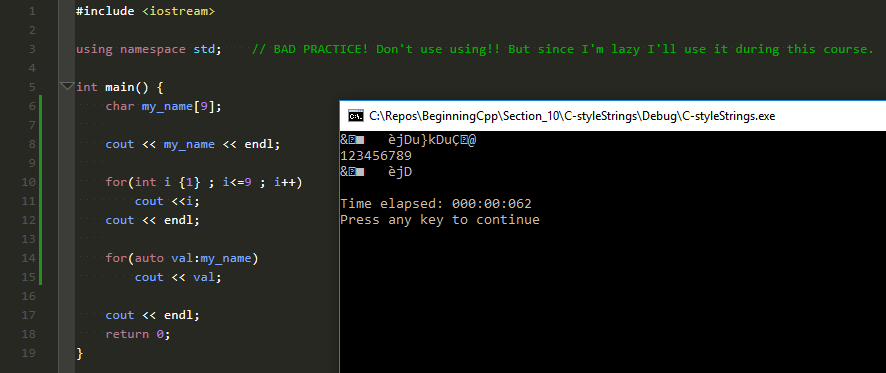
    As you can see, the first string printed is much longer than the contents of the array, and that’s because there was no termination character inside the array. Had I been unlucky, the printout might have been much, much longer. It could also have ended on the first character. We just don’t know, as the contents of the array are undefined, precisely like Franks mentions in the video.

    All C-style string functions in the cstring and cstdlib header files expect a null termination character, so it’s easy to see that you really must know what you do when working with these kinds of strings.

    Programmers are smart, so they have known how to do this for a long time, but according to the instructor, many of these problems have been solved with C++ style strings. If you ask me, that sounds like the smarter thing, have the language take care of the behind the scenes stuff and let the programmer write code.

    Lecture 96: Working with C-Style Strings

    This video is going through examples on how you write code using C-style strings.

    The instructor starts with some code showing the same I do above, but I think my example shows it better. 😊

    But I’m not putting too much effort into this lecture, as the instructor told us to use C++ style strings mostly, so I’m waiting for that in the next part. But I guess it’s important to know this style since there’s probably a lot of code using strcpy() and strcmp() out there.

    Lecture 97: C++ Strings

    I watched a video from 2016 on YouTube that said C++ doesn’t have strings. And now I watch this video where Frank says that C++ has a large and complex string system. But maybe the first guy meant it wasn’t C++ proper since it’s in the STL. If you ask me though, it’s strange not seeing the Standard Template Library as a part of the language.

    The C++ strings are object-based, so they fit into the style of C++ with the ability to use standard operators, member functions, etc. The easiest way to describe it is that it’s similar to using arrays or vectors. Both can more or less do the same, but one way is just keeping with using the old C-functions while the other way is using modern object-oriented programming.

    That means that if you go the C++ way, your strings will behave like objects and have member functions that you use on them. When you declare a string variable, it’s always initialized for you, that means no risk of printing out garbage content to the screen if you forget to do it yourself. They are also dynamic in that they can grow and shrink in size. And maybe most important, they are safer to use. The functions use bounds checking, so less risk putting data into unknown memory space.

    All in all, I will say that the looks easier and safer to use than C-style strings.

    Lecture 98: Working with C++ Strings

    Not surprisingly, this video is the instructor going through examples of using C++ style strings.

    I must say it’s much clearer using C++ style than C-style strings. Probably because I don’t know C. But if you don’t know C, you have to agree it’s much easier to understand s1 = s2, than it is to understand strcpy(s2, s1).

    Of course, in C-style, you know that you are copying strings, while in C++ you’re really not sure what types you’re assigning to each other. But with proper variable naming, that shouldn’t be a problem.

    The instructor also shows us that other significant advantage of using the object-oriented style of C++. For instance, the functions do bounds checking for you, so you will never walk yourself out of a string using a poorly constructed loop.

    Lecture 99-100: Section Challenge, Solution, and Quiz

    A pretty cool challenge in this section. We’re essentially making a decoder ring. 😊

    When you look at it, you might think that it must be very complicated to make an encoder and decoder. But then you look at the problem, break it down into parts and realize that it’s surprisingly easy. And C++ gives you all the tools you need to solve this problem.

    All in all, the program I wrote was about 40 lines. I’m sure you can make it much shorter with some effort.

    I loved this challenge since I’m a crypto nerd. Not like in the coin stuff but like secret messages. I think I’ll need to try to implement more ciphers in C++ and the Vigenère cipher for sure is something I need to work on.

    Assignment 1: Challenge Assignment – Letter Pyramid

    In this section, the instructor has also added a new kind of challenge or assignment for us. This time we need to get a string from the user, and we will then make a letter pyramid out of that string.

    I learned that it’s important to break a problem into parts. At first, I was at a loss, but it got more manageable when I identified the three elements of the problem.

    1. Print padding
    2. Print the correct number of characters starting from the front
    3. Work back through the string from the position in 2 and print each character as you go

    Then it was just a case of solving each small task, and it went somewhat easy from there.

    It’s not the prettiest code, but it works. 🙂

    What’s cool with this is that after you submit your solution, you get to see the same problem solved by three other students in the course. I must say that the answers I saw are wildly different. That also taught me a lot, since at least one of the students solved it in a brilliant way that I didn’t even remotely think about when I worked on the problem.

    And as usual, go to GitHub for my attempt at writing some C++ code.


  • Beginning C++ 82-92: Controlling Program Flow, part 2

    Let’s continue our journey through controlling the program flow in C++.

    Last time it was all about evaluating an expression and doing stuff based on the result. Our four weapons to do that was the if-statement, the if-else statement, the switch-case statement, and the conditional operator. Frank also snuck in some learning about blocks, indentation, and scope.

    In this second part, we will go through different kinds of loops and end with the section challenge and quiz.

    cable rope loops
    We’re going all loopy!

    Updated 20180730:
    Updated lecture 90-92 to reflect that I’ve now done the challenge and uploaded the result to the repository.

    Lecture 82: Looping

    C++ has two or four different types of loops, depending on how you look at it. Frank says three in the course, but I’ll stick with my claim of two or four.

    The first is a for loop which iterates something X number of times. This is a very common loop, and I have already used it in some of my code examples in earlier sections.

    Then there is a variant of this, the range-based for loop, where you, for example, go through all the elements of a vector. If you remember I used a for-based loop to do this in the section about arrays and vectors. If I had known about this type, I would have used that instead. But that’s what the course is for, learning something new.

    The third one is the while loop, which has a variant in the do-while loop, so altogether four types of loops.

    The difference between the while-types is that the while loop checks a condition at the beginning, while the do-while checks at the end. This means that a while loop may never do the code inside of it, but the do-while variant will execute the code at least once.

    Lecture 83: for Loop

    22-minute video? I thought for loops were easy… This video is actually full of information, not only on how to write a simple loop.

    Of course, he shows you that, but we are also taught how to use the modulo operator for checking specific values in a loop. He talks about the conditional operator again. He speaks more on the importance of formatting your code and how, in some instances, the compiler will help you by showing you warnings. You learn about the comma operator for using multiple variables in one loop, and he also quickly mentions how to create an endless loop.

    So as you understand, this lecture is chock full of examples. Some shown on slides, but again I like that most of them are practical examples in CodeLite. It’s all pretty straightforward, but if you haven’t written code before, I really do recommend you follow along and type the examples yourself.

    There’s a neat example the instructor writes using the conditional operator we learned about just a few lectures ago. Do try to write that one yourself before you watch Frank do it. I managed to do it, but I had to think for a few minutes on how you could put an endline into a conditional operator. We have used that method before, and some of you might get it right away, but I bet some of you, like me, had to do some thinking.

    The examples also do prepare you for the exercises he has recently added to the course, so if you did the typing while following the video, you should be set to solve the code exercise easily.

    Lecture 84: range-based for Loop

    This feature was introduced in C++11, so it’s a very new function.

    It makes it very easy to go through a vector, string, array, etc. and manipulate each element as C++ iterates through the loop. And you can also use the auto keyword with the variable, making it even easier to use this.

    This loop type is really simplifying a lot of the work needed to go through a collection compared to first finding out the size, then declaring an integer to count with, comparing that int to the size we found earlier, incrementing it, etc.

    There have been some smart thinking by the C++ guys here, I must say.

    Lecture 85: while Loop

    This is the loop to use if you want to test an expression before you run the loop code. This means that sometimes the code in the body of the loop will not run even once.

    You check a condition, and if it’s true, you run the code in the body of the loop. Then the check is rerun, and you either run the code, and the cycle continues, or you end the loop.

    It’s therefore critical to change the variable you check in the loop body. If you don’t do this, you might end up with an infinite loop.

    Lecture 86: do while Loop

    You’ll use this version of the while loop if you want the code in the loop body to execute at least once. The test will be performed after the body has finished and depended on the result, you’ll rerun the loop or jump out of the loop.

    Very similar but very nice to have both options as you sometimes do want your code to run at least once and sometimes you don’t.

    The lecture ends with the instructor writing an example of how you could make a menu selection in C++. I watched his introduction, paused the video and wrote my solution before I watched the instructor do it. I really do advise you to do this. I chose another path but got the same end result. You’ll learn so much more doing it yourself first than just watching what the instructor does and then repeating it.

    A bonus for me was that I got a bug in my code, so I had to brush up on my switch statements again to find out why the program wouldn’t do what I wanted it to. Bonus repetition for me there. YEAY!!

    And DO think about why he had to use AND not OR in the test expression. My first thought was also that he should have used an OR, so when he used AND my brows kind of met in the middle for a while. But imagine that the user types an ‘a’ and do the test expression as a mental exercise. Or on paper, that works too.

    You should end up agreeing with the instructor. And if you struggle, the answer can be found on the page about operators on cplusplus.com.

    Lecture 87: continue and break

    This was a change from the previous videos since this clocks in at under 3 minutes. But why make it long and complicated, when you can make it short and sweet?

    But I really do see that these statements can be powerful tools when used in the right places. We’ve already used break in the switch-construct to terminate and jump out of the loop.

    Continue is almost the same, but instead of jumping out of the loop, it jumps back to the beginning again continuing the next iteration.

    At first, I had to think about that continue statement, as it sounds like you should use it to continue on in the program. But it got more evident when I found out that you must think of these two related to the loop you are in. You either break out of the loop and terminate it, or you continue the loop from the beginning.

    Lecture 88: Infinite Loops

    Infinite loops are just what they sound like. Loops that never ends.

    Usually, these kinds of loops are unwanted and the result of a bug or poorly designed code, but the instructor does come up with a few examples where you would want to use a loop like this. But unless you’re writing an OS or a mobile app waiting for an input, the advice is to avoid these constructs.

    Lecture 89: Nested Loops

    Now we’re back to a lengthy video again, but again it’s mostly practical examples in the IDE after the instructor first shows us some cases.

    I listened to what the instructor wanted and wrote my code before I looked at his. This means that my code is different from the instructors. His code is better designed to show nested loops of different types and the importance of proper indentation to help with readability. My source is as always viewable on my GitHub.

    This shows how easy and powerful it is to use loops. You can do a lot with just a few lines of code.

    Lecture 90-92: Section Challenge, Solution, and Quiz

    This is a whopper of a challenge. The description is 64(!) lines long.

    If you haven’t, I really advise you to download the source code for this section. That way you can have the instructions beside you while you work on your solution. You’ll find the instructor’s source code under Section 21 – Bonus Material and Source Code.

    In short, we will print a menu, and the user will select an option, invalid options should not be allowed. The other options should let the user add numbers to a list, print them and see various information about the numbers on the list.

    I streamed me working on the coding exercises and this challenge on my Twitch channel, https://twitch.tv/oldgrumpygamer. Sadly I had to remove the VOD, but it was much the same as how the instructor did it, except I used a switch statement and took four hours to do all the coding exercises and this challenge.

    I also added some code for the extra challenges in there, so I can search the list and clear it. Also added an alternate version of the add function, so you can’t add a number that’s already in the list. If you missed the stream you can find my solution on GitHub.

    I also did the quiz for this chapter on stream. Only got 8/10 right this time, I should at least have gotten 9. My tip is to read the code examples in the questions carefully. There might be a trap or two hidden there.

  • Beginning C++ 76-81: Controlling Program Flow, part 1

    I remember when I first learned to program. It was in BASIC on the good old Commodore 64. There were loads of GOTOs all over the place, and the program code was difficult to follow.

    Hopefully the functions C++ gives us is way better control and overview of the source. I suspect we will see at least some if-else statements, some for-loops, some while-loops, and even more I can’t remember right now.

    This section is even more extensive than the previous one, so I have split this section into two blog posts. That way I can push them faster to you, and they are more readable since they aren’t so long.

    If you’re interested in taking the course yourself, you can find it on Udemy.

    men working at night
    These guys looks like they have control.

    Lecture 76: Section Overview

    In the overview, we get an introduction to the three building blocks a C++ program consists of. These are sequences, selections, and iterations. With these three items, we can write any algorithm we want.

    We also get a quick review of all of the different kinds of selection- and iteration structures that exist in C++. These will be further explained in the following lectures of this section.

    Lecture 77: if Statement

    This is an 18-minute whopper of a video, but when you see it, you will understand why. In addition to introducing and explaining the if-statement, we also learn three other features of C++; blocks, indentation, and scope.

    The if-statement is a fundamental element of every program, and it merely tests if some expression validated to true and if it does, executes one or several lines of code. This is where the equality, relational and logical operators we learned about in the last chapter comes in.

    One example from real life I’m pretty sure shouldn’t need more explanation can be coded like this:

    if (traffic_light == red) 
         stop_car();

    You notice that I’ve indented the stop_car()-line. That is to make it easier for us to read the code. The C++ compiler really doesn’t care, but it makes it easier for us humans to read the code.

    But what do you do if you want to do more than one thing? That’s where blocks come in. Something it seems we have already used in this course but haven’t thought about or had a word for. A block is one or more statements encased between { and }. If you look at the previous programs you’ve written in this course, you will see that the main()-function is just such a block.

    Here’s an example of using a block with an if-statement:

    if (traffic_ligth == green && car_is_stationary == true) {
          put_car_in_gear();
          depress_gas_pedal();
     }

    One cool thing with blocks like this is that they are also what is called a scope. What this means is for example that if you declare a variable inside a block, it will only be available inside the block.

    The instructor shows all this in a practical example using four different tests conditions. I like that he writes the programs as he talks about it, even if that means we will see errors, typos, etc. I think that the lessons we learn by hearing his reasoning as he works out the program is more important than just getting to see the finished result.

    Lecture 78: if-else Statement

    This is very similar to the if-statement we saw in the last part. You just add an else-statement that will execute if the first statement is not performed. This means you can read an if-else statement as If this check validates to true the do this, else do this other thing.

    You can also expand on this with if-else-if. With several statements like those, you can do multiple checks at once.

    Again, the lecture is closed off with practical examples using CodeLite. I can’t really come up with a better case myself, so I didn’t. 😊

    Lecture 79: Nested if Statement

    You can also nest if and if-else statements within each other. You’ll probably find yourself doing this quite often, as many decisions can’t be decided by just one statement.

    But this leads to a problem, which Franks describes as the dangling else problem. In short when you have several ifs and one just else, which if-statement does the else belong to? The rules in C++ is that an else belongs to the nearest if.

    This can get very confusing, so it’s essential to use proper indentation so you can see which if belongs to which else.

    The significant part of this lecture is again Frank going through two different practical examples. I will recommend you do them together with the instructor as you will see the efficient use of the indentations.

    In the shipping calculation example, you might see a glaring omission in the input checking. I would also add a check to see if one or more of the dimensions are below 1. So I did. 😊 As usual, you can find my code for this course on GitHub.

    I’m a little sad that it doesn’t look like CodeLite is smart enough to un-indent, if that is a word, when you’re not using a code block with {}. I need to check if that can be changed somehow.

    Lecture 80: switch-case Statement

    Another 20-minute lecture. We really get our money’s worth in this section. 😊

    This selection statement is a little different as the switch statement runs a control expression and gets a specific answer that is an integer or integer literals. You then write one or more case statements, and C++ will run the one that matches the result of the switch expression.

    The syntax is very different from an if-else statement, but the instructor shows us several examples on how this works and does some live coding in CodeLite, so I feel confident I now know how this works.

    In the first example, I elected to do my checks a little different and used toupper() on the input we got from the user. That way my select statements are a bit shorter, but I guess the instructor did it the way he did as a refresher on the Boolean operators we learned about earlier. You know where to go if you want to see my code, hint GitHub.

    In the other example, Frank quickly shows us how C++ handles a switch-case statement using an enumerator. If you forget to check for all values in an enumerator and don’t include a default, the compiler will give you a warning about this. That’s a pretty neat feature, as you will then know if you have handled all the different possibilities or not.

    Lecture 81: Conditional Operator

    ?:
    No, it’s not a malformed question lacking any words, that is the conditional operator in C++.

    I’ve seen that in many C++ programs and never understood how it worked. It should be said I didn’t work hard to understand it either, nor did I do a Google search, but it does look a little bewildering.

    Luckily it isn’t, and this 10-minute video is all it takes to get to grips with it.

    It is very similar to an if-else statement and goes like this:

    (expression to be evaluated)?(return this if true):(return this if false);

    The instructor shows us several slides on how this works and also goes through a practical example in CodeLite. So, in the end, you should have a good grasp on this strange, little operator.

    End thoughts

    I will do this section in two parts since it is another long one, but before I go, I just have one more thing to say.

    When the instructor is doing his practical examples in CodeLite, listen to him, hear him out to see what he will show you and then pause the video and try to do it yourself first. You will learn SO much more by doing that.

    You might not solve it, you might do it in a completely different way or maybe precisely as Frank does it. Either way, you have learned more coding by just trying it yourself first.

    Next time I’ll complete this section and do all lectures on looping, the challenge, and the section quiz.

  • Editing a CodeLite template

    During the course Beginning C++, we learn how to make a template in CodeLite. And templates are brilliant, as we then can re-use a setup easily without choosing the same selections every time.

    Sadly, I made an error in my template, and it took a while before I found out how to change it. Not because it is especially hard, but because I did not find any reference on how to do it on the internet and I forgot to look in the right place on my PC.

    So, I present you with how to change a CodeLite template on Windows PCs.

    abstract business code coding
    Photo by Pixabay on Pexels.com

    Where are the files located?

    All the settings for CodeLite are saved under the AppData folder, usually on the C-drive.

    The path you are looking for is usually called
    C:\Users\<username>\AppData\Roaming\codelite\templates\projects

    If you don’t see the folder called AppData, you have to enable Hidden items under the View menu.

    Hidden Items

    Change the files

    Before you do any changes to the files, remember to close CodeLite. That way you won’t have any collisions, and you will be sure that your changes are saved. Also, do make sure to take a copy of the template file. If CodeLite can’t parse it correctly, it won’t show up in the New project wizard.

    There are two or more files in the folder, depending on how many templates you have and the number of files each project contains. The main file is called something like TemplateName.project. This file contains all the settings for the template. It is just a text-file in XML-format so you can use any text editor to change whatever configuration you want and then just save the file again.

    Settings

    In the course, we are using the C++14 standard, so we set the options for the compiler to use this standard when compiling. You can find this setting again in the file:

    Template settings

    You will also see the description of the template and many other project settings in this file, including which files should be automatically included in and added to the new project.

    Included files

    Towards the bottom of the XML-file, you will see the files the project will contain when you create it in CodeLite. In my case, it’s just one file, main.cpp, and it will be placed in the src folder.

    VirtualDir

    You can add more files to a project template by just creating them and saving them to the template folder and then add a new line for each file you want to add.

    AddFiles

  • Beginning C++ 62-75: Statements and Operators

    I’m a little bit unsure of what this section will teach us, but I think we’ll learn more about the keywords, etc. that C++ uses in a program. Operators are probably stuff like plus, equality, etc., but we’ll see.

    It’s a relatively long section with 15 lectures and several 10+ minute long videos, so let’s dive in.

    If you’re interested in taking the course yourself, you can find it on Udemy.

    PS! I’m sorry this is so long, but it’s a long section. Please give your feedback in the comments if I should split up these longs posts in multiple parts.

    adult doctor girl healthcare
    I really need to get better at finding pictures that illustrate the topic.

    Lecture 62: Section Overview

    Again, an excellent overview of what we will learn.

    As I said earlier, I was a little unsure of what expressions, statements, and operators meant. The only thing I could come up with was mathematical operators like plus, minus, etc. But after this section, we have some idea of what we’ll learn in these lectures.

    Lecture 63: Expression and Statements

    Here we get some examples of what expressions and statements are.

    Expressions are a sequence of operators that gives us some result. Some examples are:

    • 5 + 2
    • a = b
    • number_1 > number_2

    Statements are a complete line of code that contains one or more expressions.

    • double VAT_rate {0.25};
    • cout << “The VAT on this item is ” << VAT_rate * item_price << endl;

    Notice that both statements end with a semicolon. That is what makes it a complete statement.

    Lecture 64: Using Operators

    Operators are pretty easy to understand, but C++ got a bunch of them.

    For instance, you got the assignment operator (=) that assigns a value to something. You got plus and minus (+, -), etc. for calculations. You got operators that allow you to check the relation between different objects (less than, larger than, < and >) and then you use that comparison in logical operators to do one or several things, based on the result of the comparison.

    Some operators work on just one object, like turning a positive number into a negative one. Then you have operators that work on two objects, for instance, multiplication. And lastly, you have some that operate on three operands.

    I think this is one of the things that are way more complicated to understand when you read it in text than when you see it in a program. The instructor promised us practical examples in the coming lectures, and I think everything will get clearer at that point.

    Lecture 65: The Assignment Operator

    The assignment operator in C++ is =. Using variable_name = some_value will assign the variable variable_name the value some_value. It’s pretty easy, but there are a few things you need to know.

    The types on each side need to be the same. Both need to be number-values, strings, etc. You can’t put “This is a sentence” into an integer variable. Another thing you can’t do is assigning a new value to a constant. You’ve told the compiler that the value shouldn’t change, so naturally, it will complain if you try to do just that.

    The assignment operator also has a few tricks up its sleeve. For instance, you can assign multiple values in one operation.

    This lecture shows us all of this in practical examples in this video.

    One operator that looks very similar to the assignment operator and you will see in all C++ programs is == or two equal signs. For example, variable1 == variable2. This statement is checking if the values are the same. The statement is NOT assigning the value of variable2 into variable1.

    Lecture 66: Arithmetic Operators

    This is just as easy as it sounds. It’s the addition, subtraction, multiplication, and division you learned at school. You also get one that you didn’t learn, modulo, but modulo is just the remainder of a division operation.

    All the first four operators work on several types, int, doubles, etc. This is our first example of overloading when an operator works with multiple types.

    The modulo-operator is not overloaded and only works on ints.

    When you watch this video, everything is shown in clear examples. There’s also a practical example showing how to convert Euros to USD in C++ using all we’ve learned so far.

    The video seems to stop right in the middle of a sentence, but it’s just the wrapping up part, so I don’t think we’re losing any content.

    Lecture 67: Increment and Decrement Operators

    This lecture teaches us about the ++ or — operator. They’re easy to use, but there are still some pitfalls in using them.

    You can use them both before and after the variable you want to use them on, var++ or ++var. This can cause trouble if you place it in the wrong location. The instructor shows us with practical examples of what happens when, so you should know the difference after this lecture.

    You might remember I used this operator in the last sections challenge, where I used it in some for-loops. That is one of the places that this operator is frequently used. The instructor doesn’t recommend you use this operator too much as it can easily be unclear what happens, but for-loops are one of the places he mentions it being OK using it.

    DO NOT use it twice on the same variable in the same statement. That’s undefined behavior, so you do not know what will happen when doing that.

    agent-business-call-center-41280.jpeg
    This is an example of a phone operator. She’s not included in C++.

    Lecture 68: Mixed Expressions and Conversions

    Sometimes you use an operator on variables of different types. C++ will then try to convert the operands to be of the same type. If it can’t convert the types, the compiler will throw an error at you.

    C++ arranges the types into a hierarchy of lower and higher types. Higher types can hold larger values than lower types. C++ can then use coercion to promote a lower type to a higher type or demote a higher type to a lower type.

    These conversions can have the effect of you losing information. You can, for instance, convert a double to an int. If the value of the double is 100.2, the int will only hold the value 100, and the 0.2 part is lost.

    Sometimes the compiler doesn’t do a conversion when we want it to. We can then explicitly tell it to do that by using what’s called explicit casting.

    This lecture goes through the rules of what happens when you do casting in C++ and ends with us writing a program that asks for three integers and calculates and prints the total sum and the average.

    I wrote a variant of the program where I first ask the user how many numbers he wants to enter. I then read the values into a vector using a for-loop, and at the same time, I calculate the total. In the end, I present the total and the averages using both integer math and by casting to double. As always you can find my source code on GitHub.

    Lecture 69: Testing for Equality

    This is an easy lecture as it’s just showing you that C++ can check if to values are equal or not equal. This is done using == or !=.

    But even if it’s easy to check. This is also a source of bugs in many programs, as it’s easy to do things like val1 = val2 for checking for equality. This will not work as using just one equal sign assigns a value in C++. You must remember to use val1 == val2 to do these kinds of checks.

    And again, this course goes further than any others I’ve taken. This is the first time I’ve heard about the keywords boolalpha and noboolalpha.

    The lecture goes into practical examples showing you all how this works. It’s worth watching this lecture as you might get surprised at how doubles work and are stored internally in C++. Two different numbers might not necessarily look that way to C++. I also show this in my own test program.

    Lecture 70: Relational Operators

    In addition to checking for equality, C++ can also check other types of relations between different values. This lecture shows you four other relational operators that C++ contains now and a new one that will be introduced in C++20.

    You have the standard >, <, >=  and <= for checking for greater than, less than, greater than or equal to, or less than or equal to.

    C++20 will get a crazy three-way operator that can tell you with just one statement if two values are equal, or which side is the larger.

    Frank again shows us practical examples of how this is done. I didn’t do my own source code for this part, as it should be reasonably self-explanatory.

    Lecture 71: Logical Operators

    This part goes into what’s called logical operators; not (!), and (&&) and or(||). You use these when you want to use boolean algebra on one or more statements. You will always get true or false as the answer when you do this.

    The lecture goes through boolean algebra using a truth table to show you what these operators do. The instructor also shows you the precedence of these operators, so you know which one is getting evaluated first in a complicated statement.

    He also explains something called short-circuit evaluation. This is common to many programming languages, and smart programmers use this to optimize the code. In short, it means that the program stops evaluating the expression as soon as it knows what the result will be, even if just some of the statements have been evaluated.

    A significant part of this lecture is again devoted to practical examples using CodeLite. I didn’t write any code of my own this time either as I think Franks examples are comprehensive and much better than whatever I could come up with. We’re also nearing the section challenge, and I suspect logical operators will be a part of that.

    Lecture 72: Compound Assignment Operators

    This lecture goes through compound C++ operators. This is a kind of shorthand you can use to write less code.

    An example is these two lines.

    • num1 = num1 + 3
    • num1 += 3

    They both do the same, namely, add 3 to the value of num1. As you can see this can lead to much less writing and it’s also easy to read.

    The lecture has a table showing 10 different operators C++ have and I would advise you to learn them as they are ubiquitous in C++ programs.

    Lecture 73: Operator Precedence

    This is yet another lecture you must accept and learn. The table shown in this part is not complete, but there are many lists on the internet showing you a full set, for instance, this one on cppreference.com.

    The lecture then goes on to explain the difference between precedence and associativity. Precedence is which of different operators that are evaluated first. Associativity is which part of a statement that is evaluated first if the operators are the same or have the same precedence.

    If you are unsure of the order in which an expression will evaluate, it’s always good practice to use parenthesis. That way you can be sure to get the result you expect.

    Lecture 74-75: Section Challenge, Solution, and Quiz

    For the challenge this time we are going to make a program that asks for an amount given in cents. We will then display how this can be divided up into a correct change in dollars, quarters, dimes, nickels, and pennies.

    The instructor gives us one hint and one tip here. First, he asks us to write down in simple English, or another language, how you will solve the problem before starting to code. Next, he gives us a tip that this can be addressed using the modulo operator.

    My thinking on how to solve this is as follows:

    1. Ask the user for the amount
    2. Divide amount with 100 to get the number of dollars and then use modulo 100 to get the remainder
    3. Divide remainder with 25 to get quarters and then use modulo 25 to get the new remainder
    4. Divide remainder with 10 to get quarters and then use modulo 10 to get the new remainder
    5. Divide remainder with 5 to get quarters and then use module 5 to get the pennies
    6. Print the results

    All division is using integer division since we won’t be using decimal numbers in this program.

    I tried to code this to the best of my ability, and as always you can find my solution on my GitHub-page. My program is not at all advanced. I could use checks to see if amount equals zero and then skip the calculation etc., but since we don’t learn about if-else and other such statements until next section, I chose to skip that here.

    The instructor gives us two examples of how he did this. My version was pretty similar to his version using modulo, but he declared the value of dollars, quarters, etc. in constants which make it easier to read as it doesn’t use the magic numbers that my solution did. I, therefore, decided to change this in my uploaded source code.

    In this sections quiz, I only managed 9 correct of the 10 questions. The difficulty ramps up now, as you really need to sit down and do the math, comparison, etc. to get the right answer. But I do see that the instructor has now included an explanation of the answer even when you get it right. That I DO like because then I know if my thought process was the right one.